- Published on
How to install ComfyUI
- Authors

- Name
- F4AI

ComfyUI is a node-based user interface for Stable Diffusion. It’s gaining popularity among Stable Diffusion users. Developers and artists widely use it because it is extremely configurable.
It is an excellent alternative to traditional Stable Diffusion GUIs like AUTOMATIC1111, Forge, and SD.Next.
This guide covers installing ComfyUI on Windows and Mac. I also maintain a ComfyUI Colab notebook for running it online.
See the Beginner’s Guide for using ComfyUI.
Table of Contents
- Benefits of ComfyUI
- Alternative to local installation
- Installing ComfyUI on Windows
- Installing ComfyUI on Mac M1/M2
- Generating an image
- Sharing models between AUTOMATIC1111 and ComfyUI
Benefits of ComfyUI
Why use ComfyUI? It offers a different experience from other GUIs. ComfyUI stands out in the following areas.
1. Lightweight
Unlike other full-feature GUIs such as AUTOMATIC1111, ComfyUI only loads what is necessary. This results in lower memory usage and faster generations.
2. Flexible
ComfyUI is very configurable. You can easily generate two images with different CFG scales in a single workflow and compare the results.
3. You know what it is doing
If you have a good knowledge of how Stable Diffusion works, ComfyUI shows you precisely what it does. No more guesswork.
4. Easy to share workflows
Instead of writing a description of what buttons to click, you can save a workflow and share it with someone else.
5. Good for prototyping
It’s a godsend for developers because you can prototype a workflow before coding it for production.
6. Cutting-edge workflows
AUTOMATIC1111 used to be the first GUI to implement the latest tools coming out from the research labs. But now, the software team is more cautious in pushing out new features.
ComfyUI has the benefit of being agile. Their node-based system allows many more users to wire up and share workflows. You can count on ComfyUI to use the latest goodies.
Alternative to local installation
Installing and maintaining ComfyUI locally is not easy. After a successful installation, you must keep the software and custom nodes up-to-date.
Check out Think Diffusion for a fully managed ComfyUI online service. They offer 20% extra credits to our readers. (and a small commission to support this site if you sign up)
Installing ComfyUI on Windows
Two options to install ComfyUI on Windows:
- Standalone zip
- Manual installation
If you are not a developer of ComfyUI, you should use option 1. Option 2 is for folks who like to tinker with codes.
I will only go over option 1 here. Consult this guide for option 2.
Step 1: Install 7-Zip
You need the 7-zip software to uncompress ComfyUI’s zip file.
Download 7-zip on this page or use this direct download link.
Double-click to run the downloaded exe file. Click Install to install 7-zip on your PC.

Step 2: Download the standalone version of ComfyUI
Download ComfyUI with this direct download link.
When it is done, right-click on the file ComfyUI_windows_portable_nvidia_cu118_or_cpu.7z, select Show More Options > 7-Zip > Extract Here.

Your PC should be working hard for a while. When it is done, there should be a new folder called ComfyUI_windows_portable.
Feel free to move this folder to a location you like.
Step 3: Download a checkpoint model
You need a checkpoint model to start using ComfyUI.
You have two options: (1) download a model, or (2) share models with other Stable Diffusion GUI such as AUTOMATIC1111.
Feel free to download any model. Here’s the download link for the DreamShaper 8 model.
Put the model in the folder
ComfyUI_windows_portable\ComfyUI\models\checkpoints
Step 4: Start ComfyUI
If you have an Nvidia GPU: Double-click run_nvidia_gpu.bat to start ComfyUI.
If you don’t: Double-click run_cpu.bat to run ComfyUI slooowly…
ComfyUI should automatically start on your browser.
Updating ComfyUI on Windows
To update ComfyUI, double-click to run the file ComfyUI_windows_portable > update > update_comfyui.bat.
Installing ComfyUI on Mac M1/M2
Installing ComfyUI on Mac is a bit more involved. You will need MacOS 12.3 or higher for MPS acceleration support.
Click on the Apple icon at the top left corner and select About this Mac to check.
The following steps install ComfyUI in a virtual environment.
Step 1: Install HomeBrew
Homebrew is a package manager for Mac. Open the Terminal app, paste the following command, and press return.
/bin/bash -c "$(curl -fsSL https://raw.githubusercontent.com/Homebrew/install/HEAD/install.sh)"
Step 2: Install a few required packages
Open a new terminal and run the following command
brew install cmake protobuf rust [email protected] git wget
Confirm the Python version
python3 --version
It should state Python 3.10.6.
Python 3.11.x and 3.12.x would also work.
Step 3: Clone ComfyUI
Clone the ComfyUI code on your local storage by running the following in Terminal.
git clone https://github.com/comfyanonymous/ComfyUI
Step 3: Install ComfyUI
Now go into ComfyUI’s directory.
cd ComfyUI
Create a virtual environment.
python3 -m venv venv
Install PyTorch in the virtual environment.
./venv/bin/pip install torch torchvision torchaudio
Install the required packages for CompfyUI.
./venv/bin/pip install -r requirements.txt
Step 4. Download a stable diffusion model
You will need a model to run Stable Diffusion. Use the following link to download the v1.5 model.
Put the checkpoint model in the folder models/checkpoints.
Alternatively, run the following command to download the model.
wget -P models/checkpoints https://huggingface.co/runwayml/stable-diffusion-v1-5/resolve/main/v1-5-pruned-emaonly.ckpt
Step 5: Start ComfyUI
Start ComfyUI by running the following command.
./venv/bin/python main.py
Updating ComfyUI on Mac
Run the following command in the comfyUI folder to update ComfyUI:
git pull
Generating an image
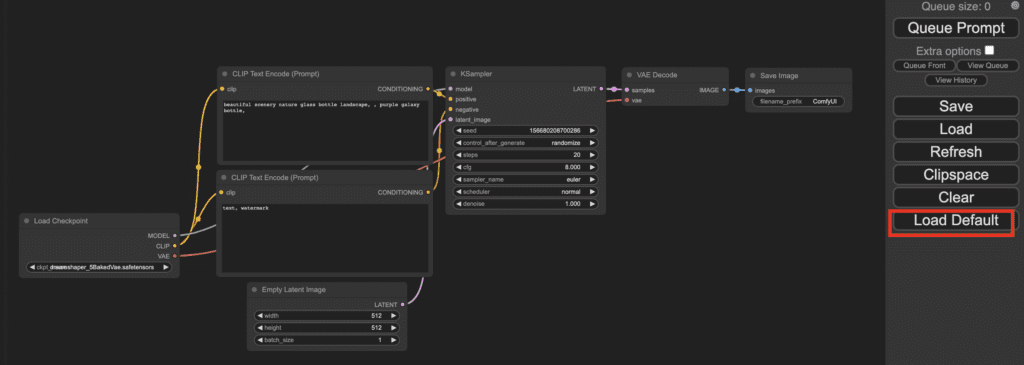
After starting ComfyUI for the very first time, you should see the default text-to-image workflow. It should look like this:

If this is not what you see, click Load Default on the right panel to return this default text-to-image workflow.
1. Selecting a model

First, select a Stable Diffusion Checkpoint model in the Load Checkpoint node. Click on the model name to show a list of available models.
If the node is too small, you can use the mouse wheel or pinch with two fingers on the touchpad to zoom in and out.
If clicking the model name does nothing, you may not have installed a model or configured it to use your existing models in A1111. Go back to the installation section to fix it first.
2. Enter a prompt and a negative prompt

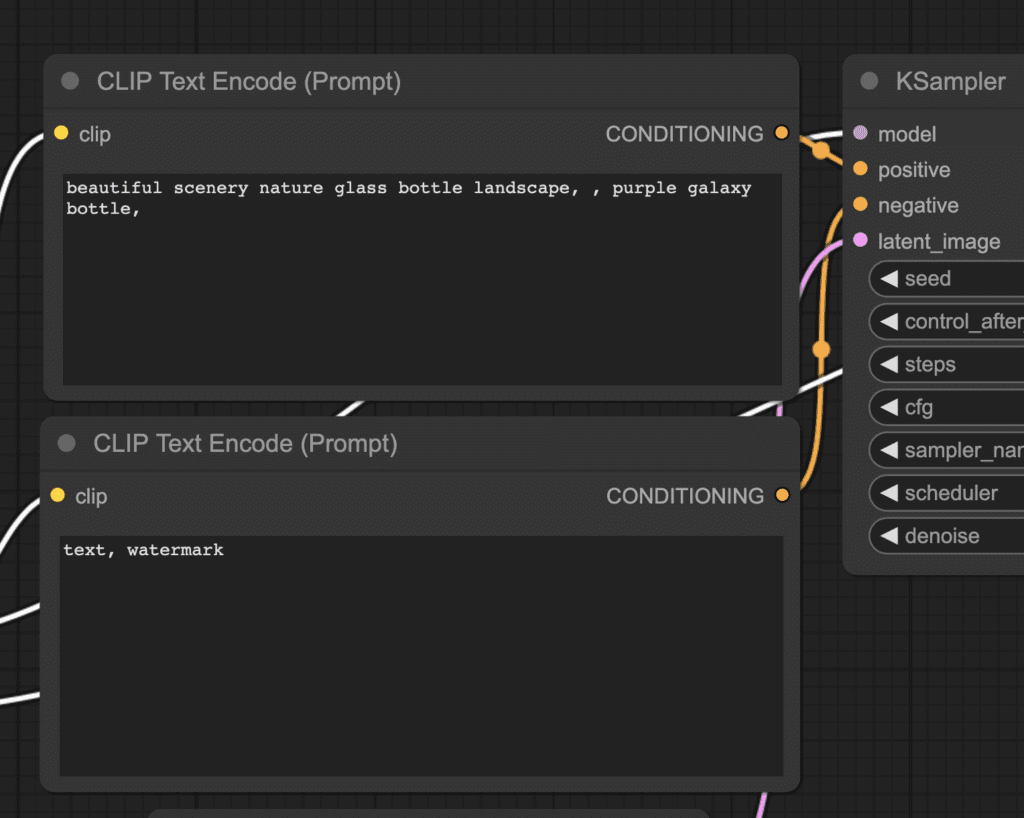
You should see two nodes with the label CLIP Text Encode (Prompt). Enter your prompt in the top one and your negative prompt in the bottom one.
3. Generate an image
Click Queue Prompt to run the workflow. After a short wait, you should see the first image generated.

Sharing models between AUTOMATIC1111 and ComfyUI
If you have AUTOMATIC1111 Stable Diffusiion WebUI installed on your PC, you should share the model files between AUTOMATIC1111 and ComfyUI. Otherwise, your hard drive will be full.
Rename the file ComfyUI_windows_portable > ComfyUI > extra_model_paths.yaml.example to extra_model_paths.yaml.
Change this line:
base_path: path/to/stable-diffusion-webui/
Replace path/to/stable-diffusion-webui/ to your actual path to it. E.g.
base_path: C:\Users\USERNAME\stable-diffusion-webui
Restart ComfyUI completely. If the configuration is correct, you should see the full list of your model by clicking the ckpt_name field in the Load Checkpoint node.

You can use this technique to share LoRA, textual inversions, etc between AUTOMATIC1111 and ComfyUI.